

In brief
Purpose: use OBS to inject content into the webcam
Video configuration
- Launch OBS
- Click on Start Virtual Camera
- In Zoom/Teams, use OBS-Camera instead of the PC camera
Audio Configuration
- Install VB-Audio
- OBS: Set VB-Audio as the monitoring device
- File menu / Settings / Audio / Advanced / Audio Monitoring Device / CABLE Input (VB-Audio Virtual Cable)
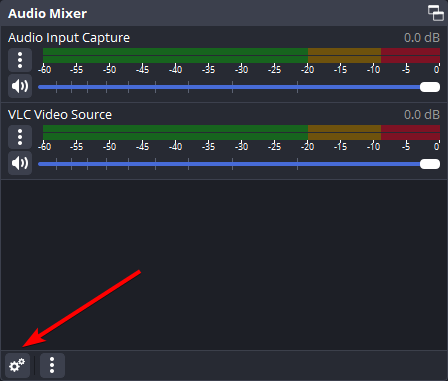
- OBS: Enable sound monitoring
- In the main window / Audio Mixer / Properties
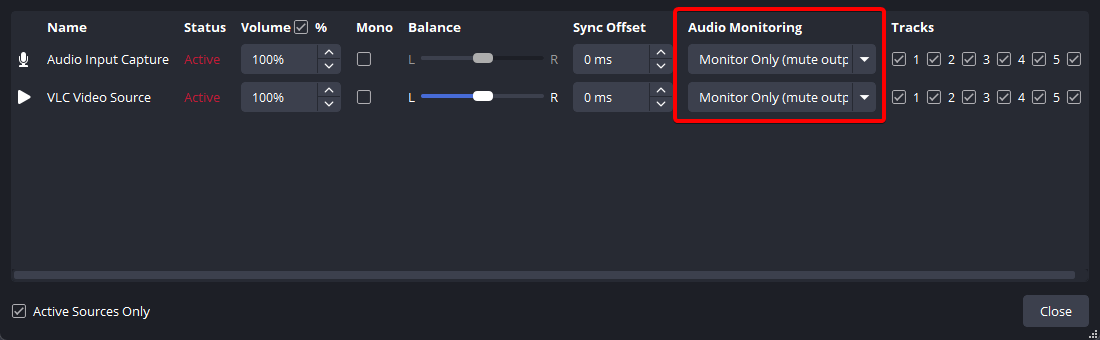
- In the Advanced Audio Properties window, for each audio source, select Monitoring only (output muted)
- OBS: Set the microphone for Mic/Aux
- Mic/Aux / ... / Properties / Device / Microsoft Array (or other microphone)
- The Mic/Aux level should activate when you speak. If this is not the case, restart OBS.
- In Zoom/Teams, for the microphone, use Cable Input
In detail
When you're in a call on Teams or Zoom, it's possible to show your audience more than just your webcam.
Of course, with these platforms, you can share your screen, a window, or a media file.
But we're talking here about two differences:
- We're not sharing our screen: participants see our webcam, but the image they receive includes much more than just the webcam
- It's not just about sharing content, but a scene, blending different types of content like Twitch streams
- Your scene can contain your webcam in a corner, a video, decorations, and anything your imagination allows.
Besides the intrinsic benefits described here, this solution allows you to stream a video smoothly when video sharing is limited in quality, or simply impossible.
This solution uses the OBS software, and this article mainly aims to clearly explain the concept of Monitoring in OBS and the function of the VB-Audio Virtual Cable driver.
Injecting the Image
We'll talk about injecting sound later.
The first step is to inject the image into your webcam. Nothing could be easier.
- In OBS, build your scene however you like.
You need at least the following elements:
- Video Capture Device: your PC’s webcam
- Audio Input Capture: your PC’s microphone
- a media source, for example VLC Video Source
- Still in OBS, click the "Start Virtual Camera" button
- In Teams or Zoom, instead of selecting your PC's webcam, use the new OBS Virtual Camera.
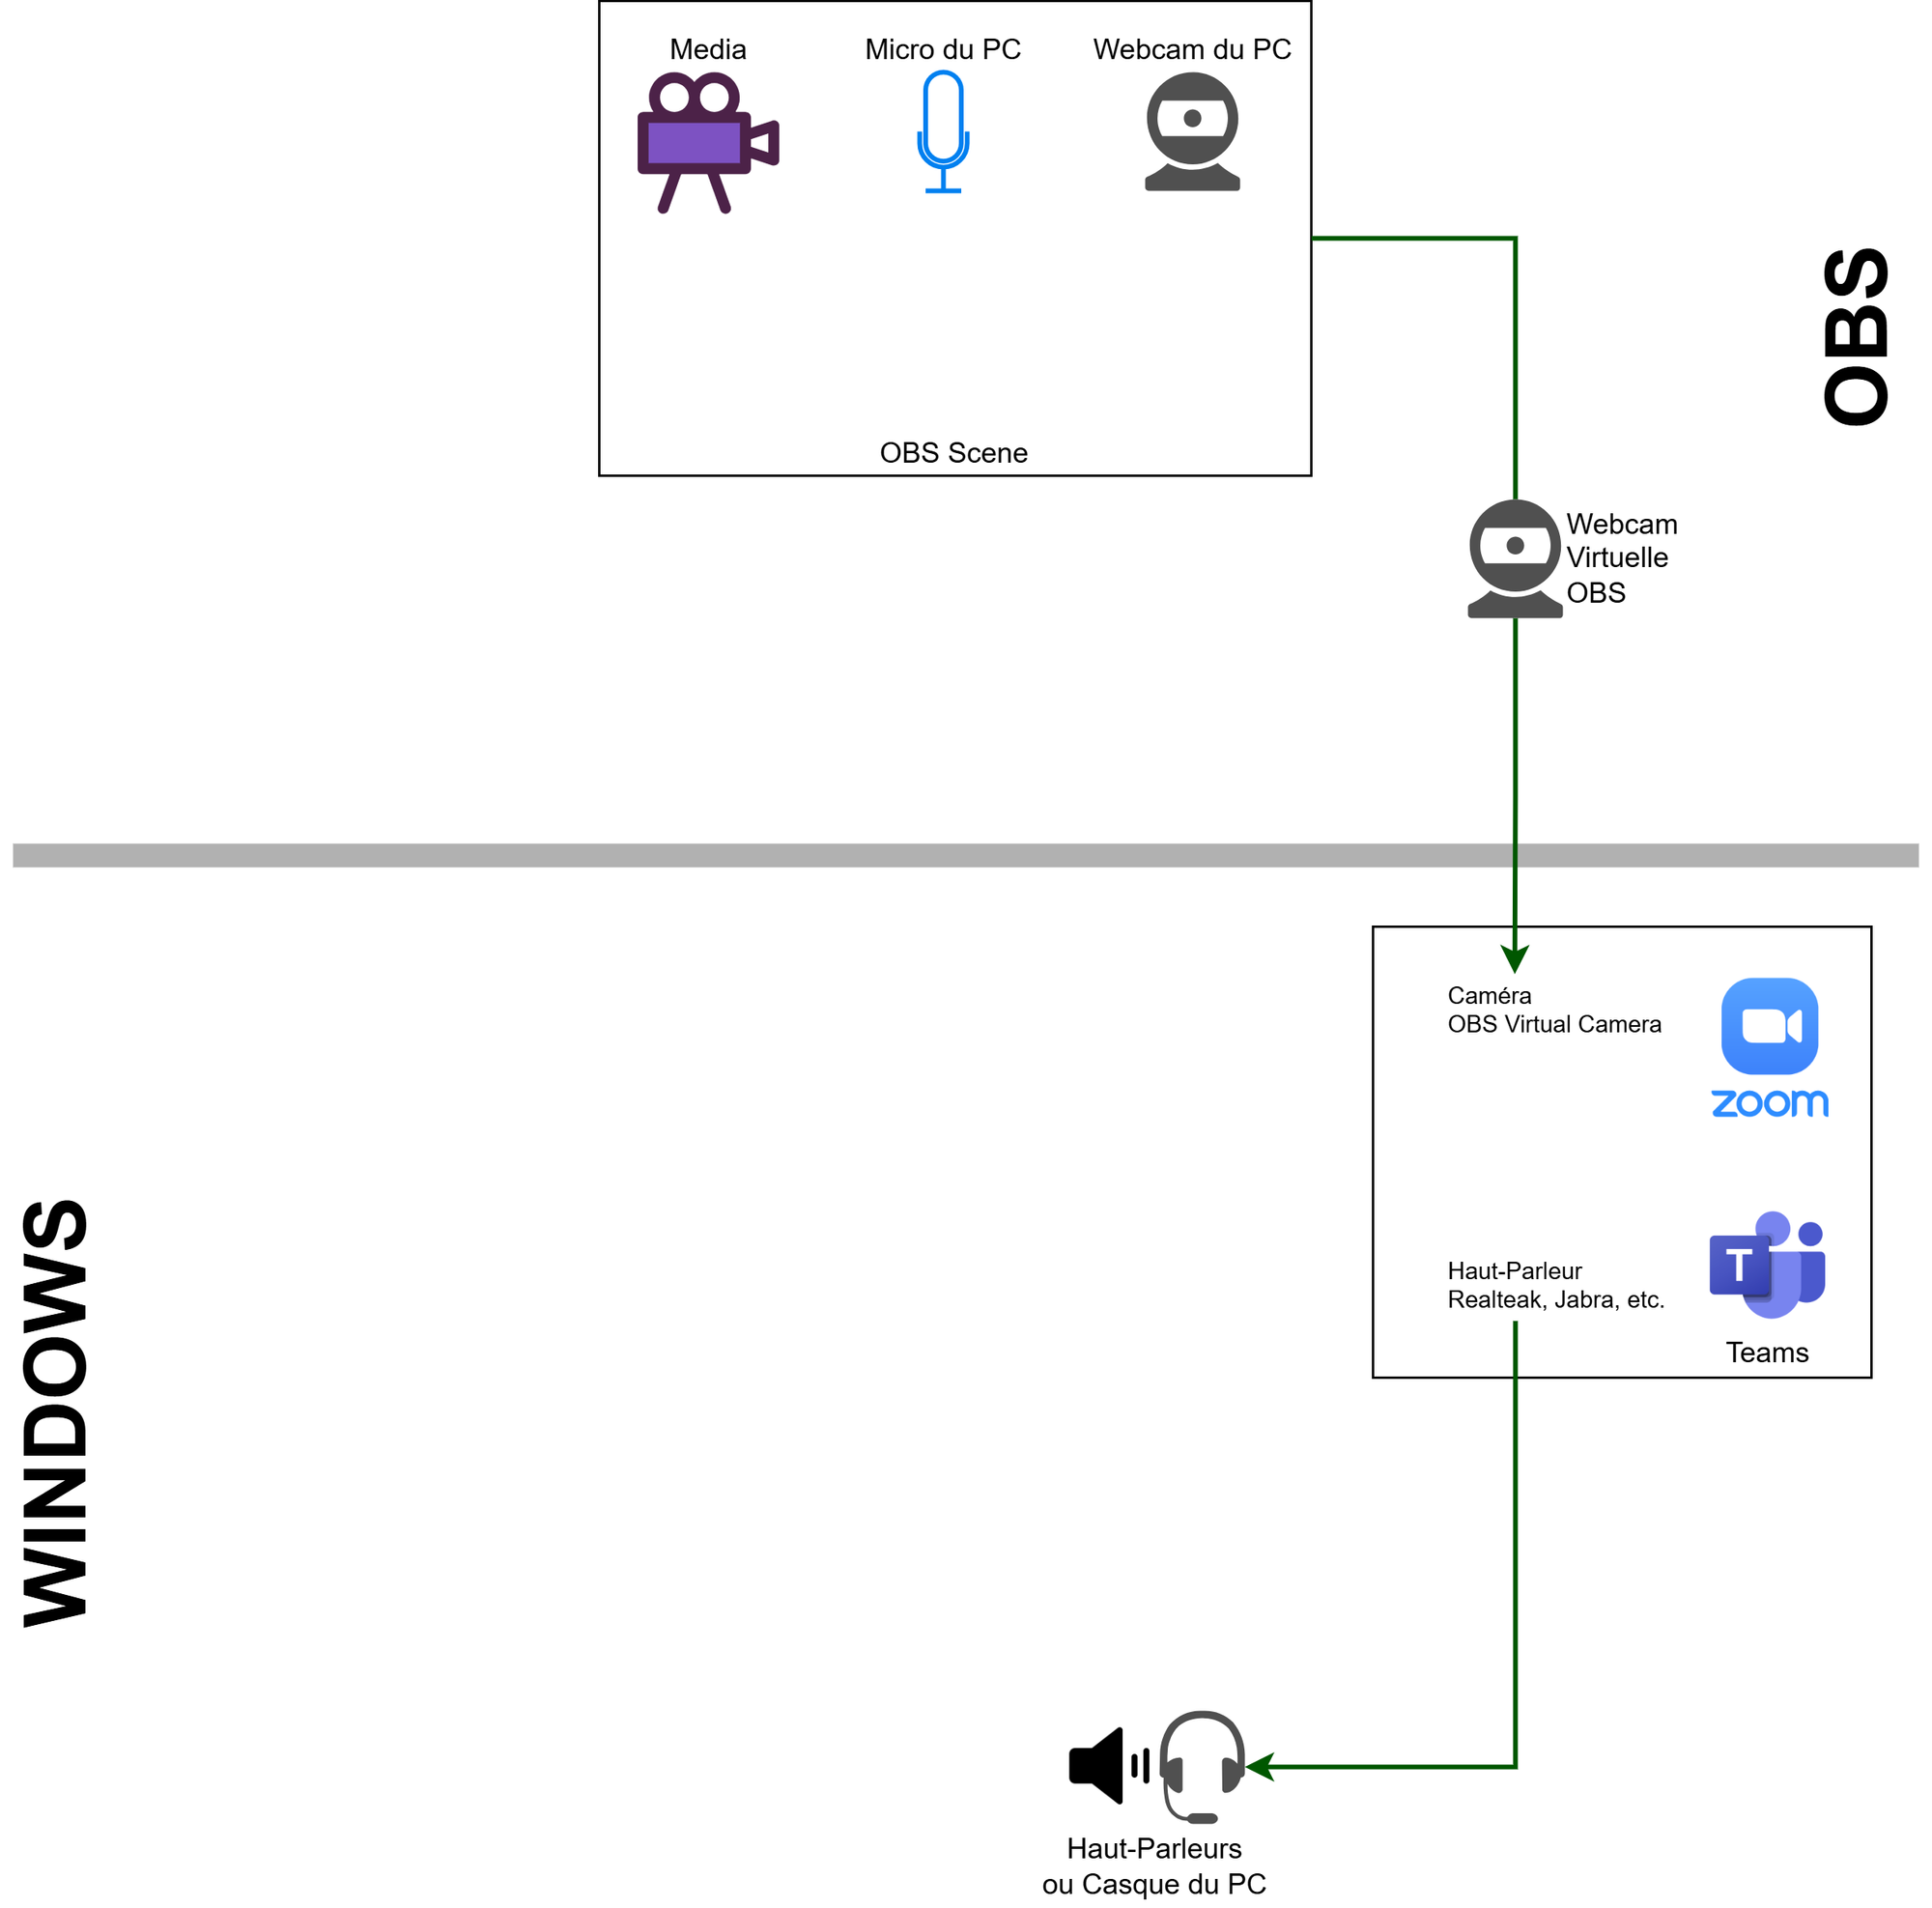
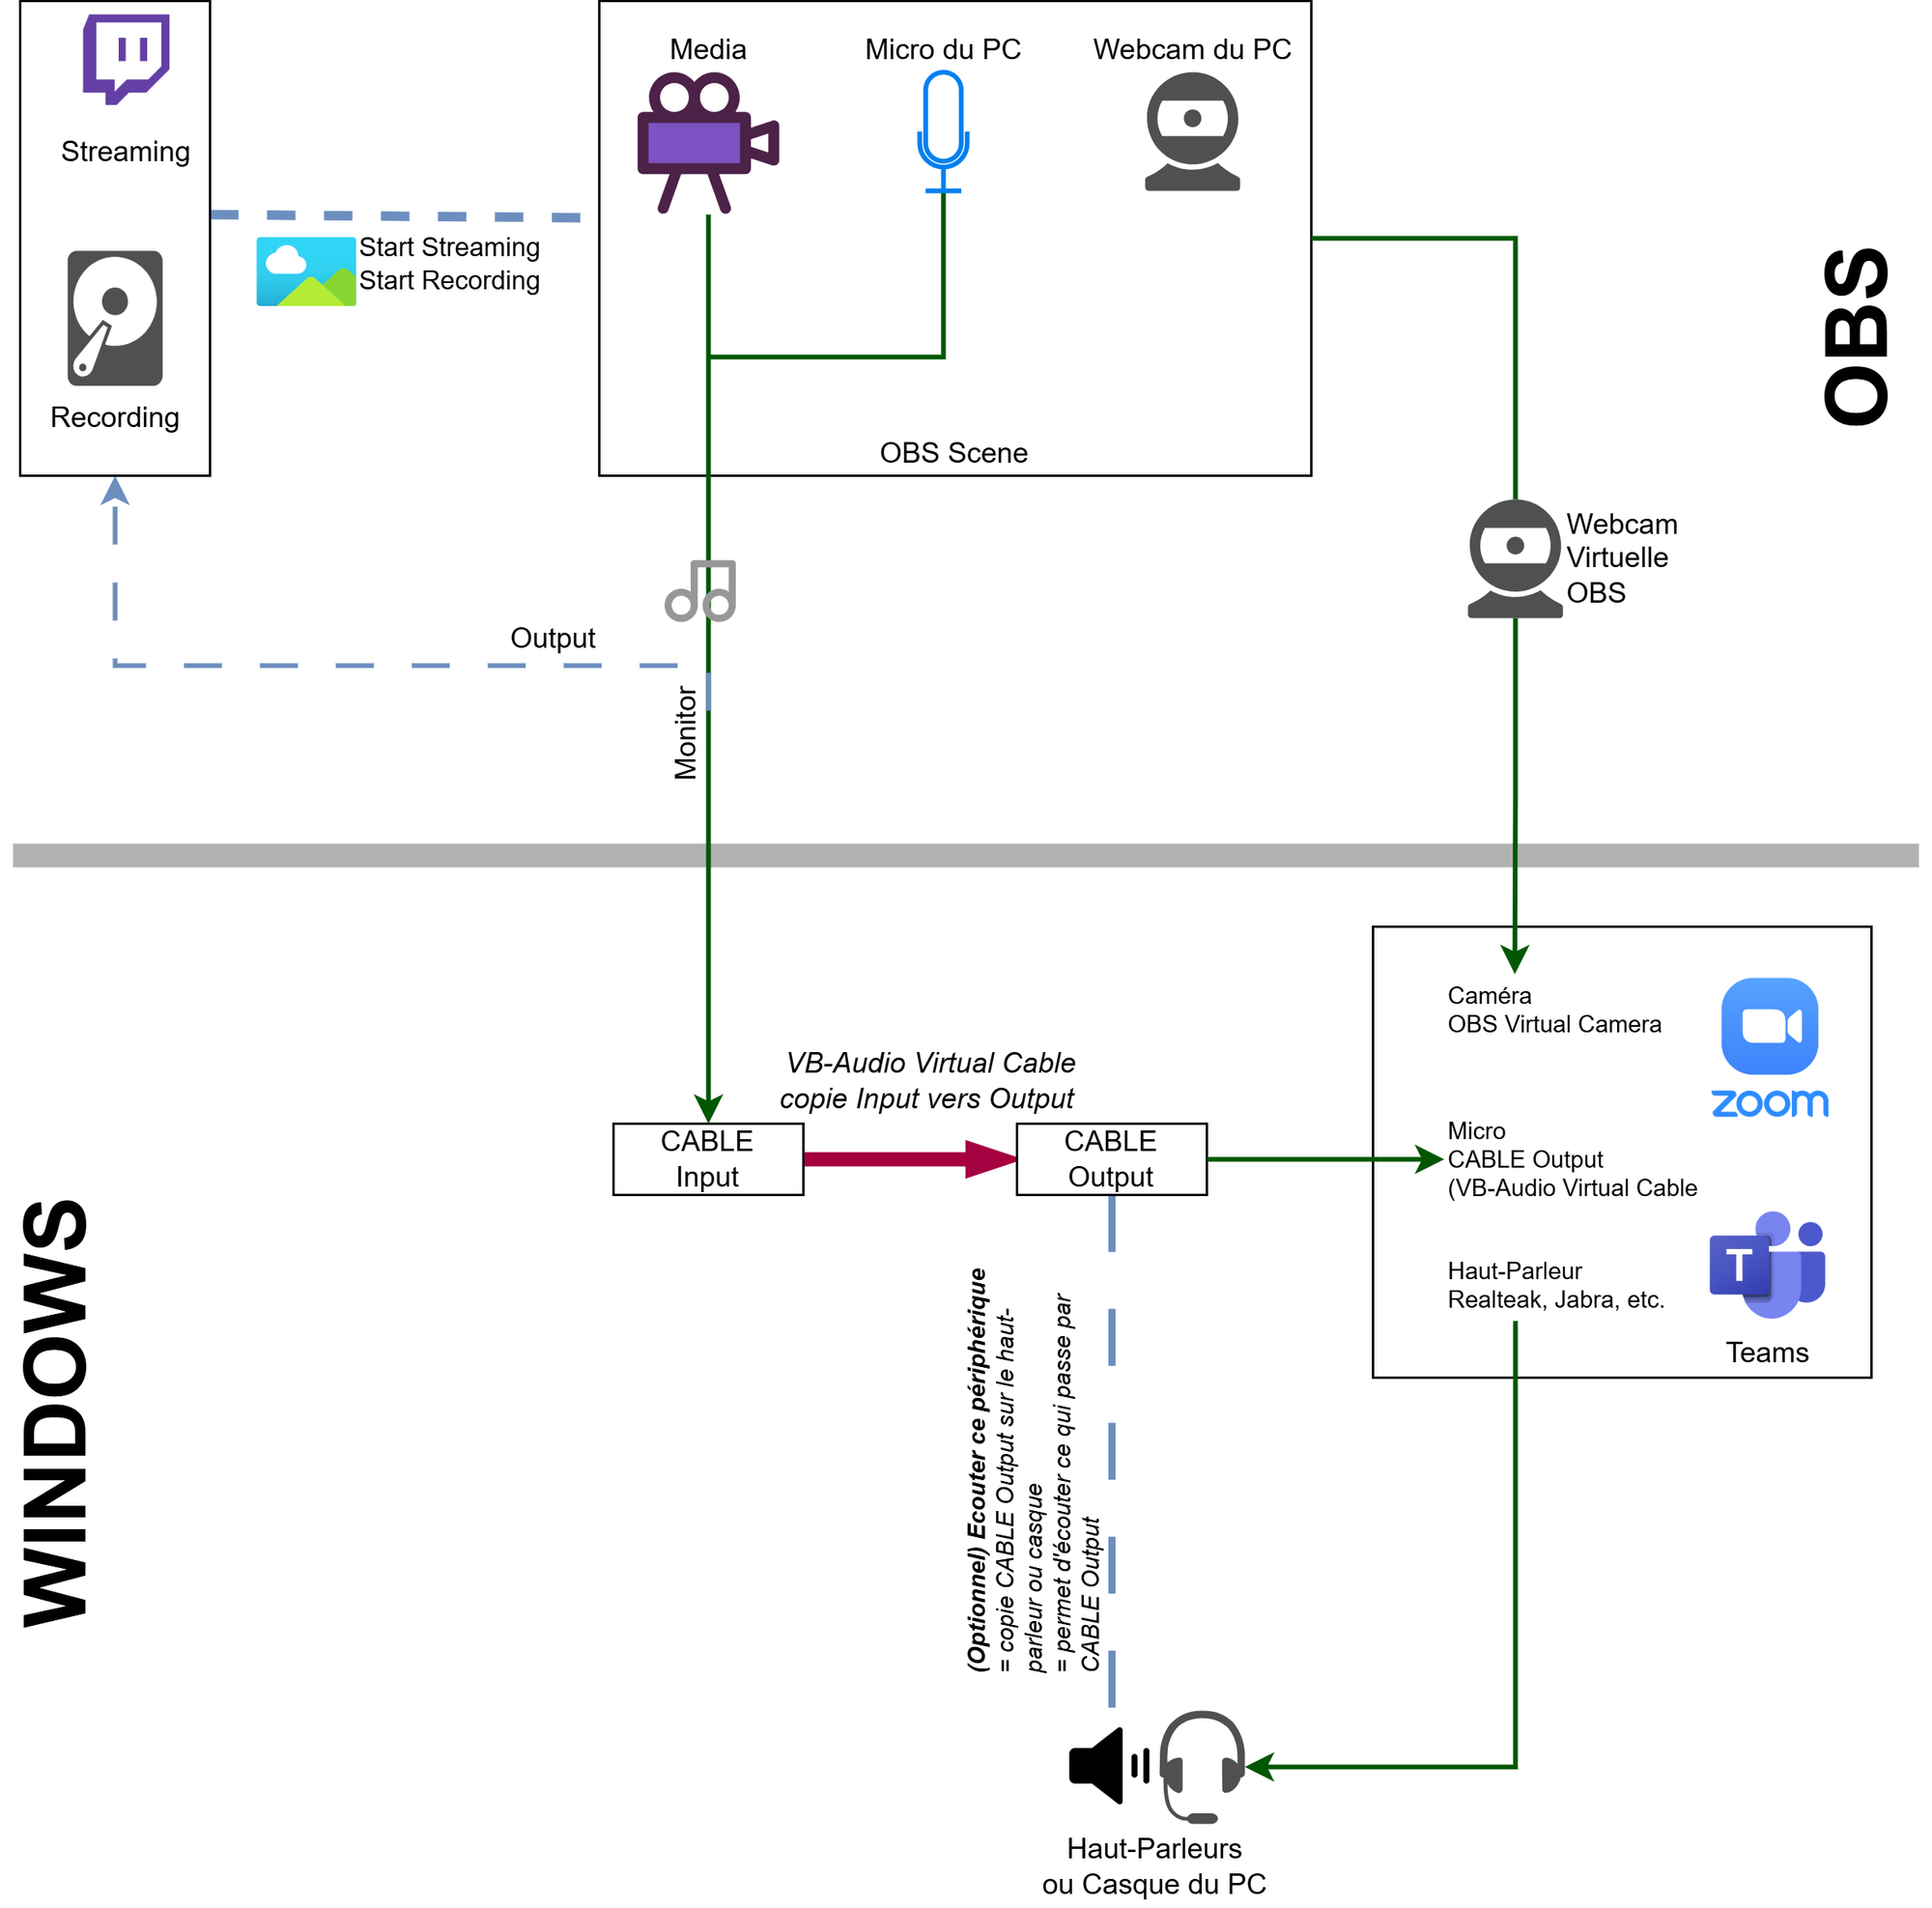
Magic result: what you included in your scene appears in this virtual webcam seen by your audience.
In the following diagram, we built our scene with a media (a video) and the PC’s webcam.
This scene is injected into the virtual webcam.
The sound received from our participants is played through our headset or speakers, nothing unusual.
Injecting the Sound
Prerequisite: Install VB Audio Cable
We’ll explain its function and installation next:
https://vb-audio.com/Cable/index.htm
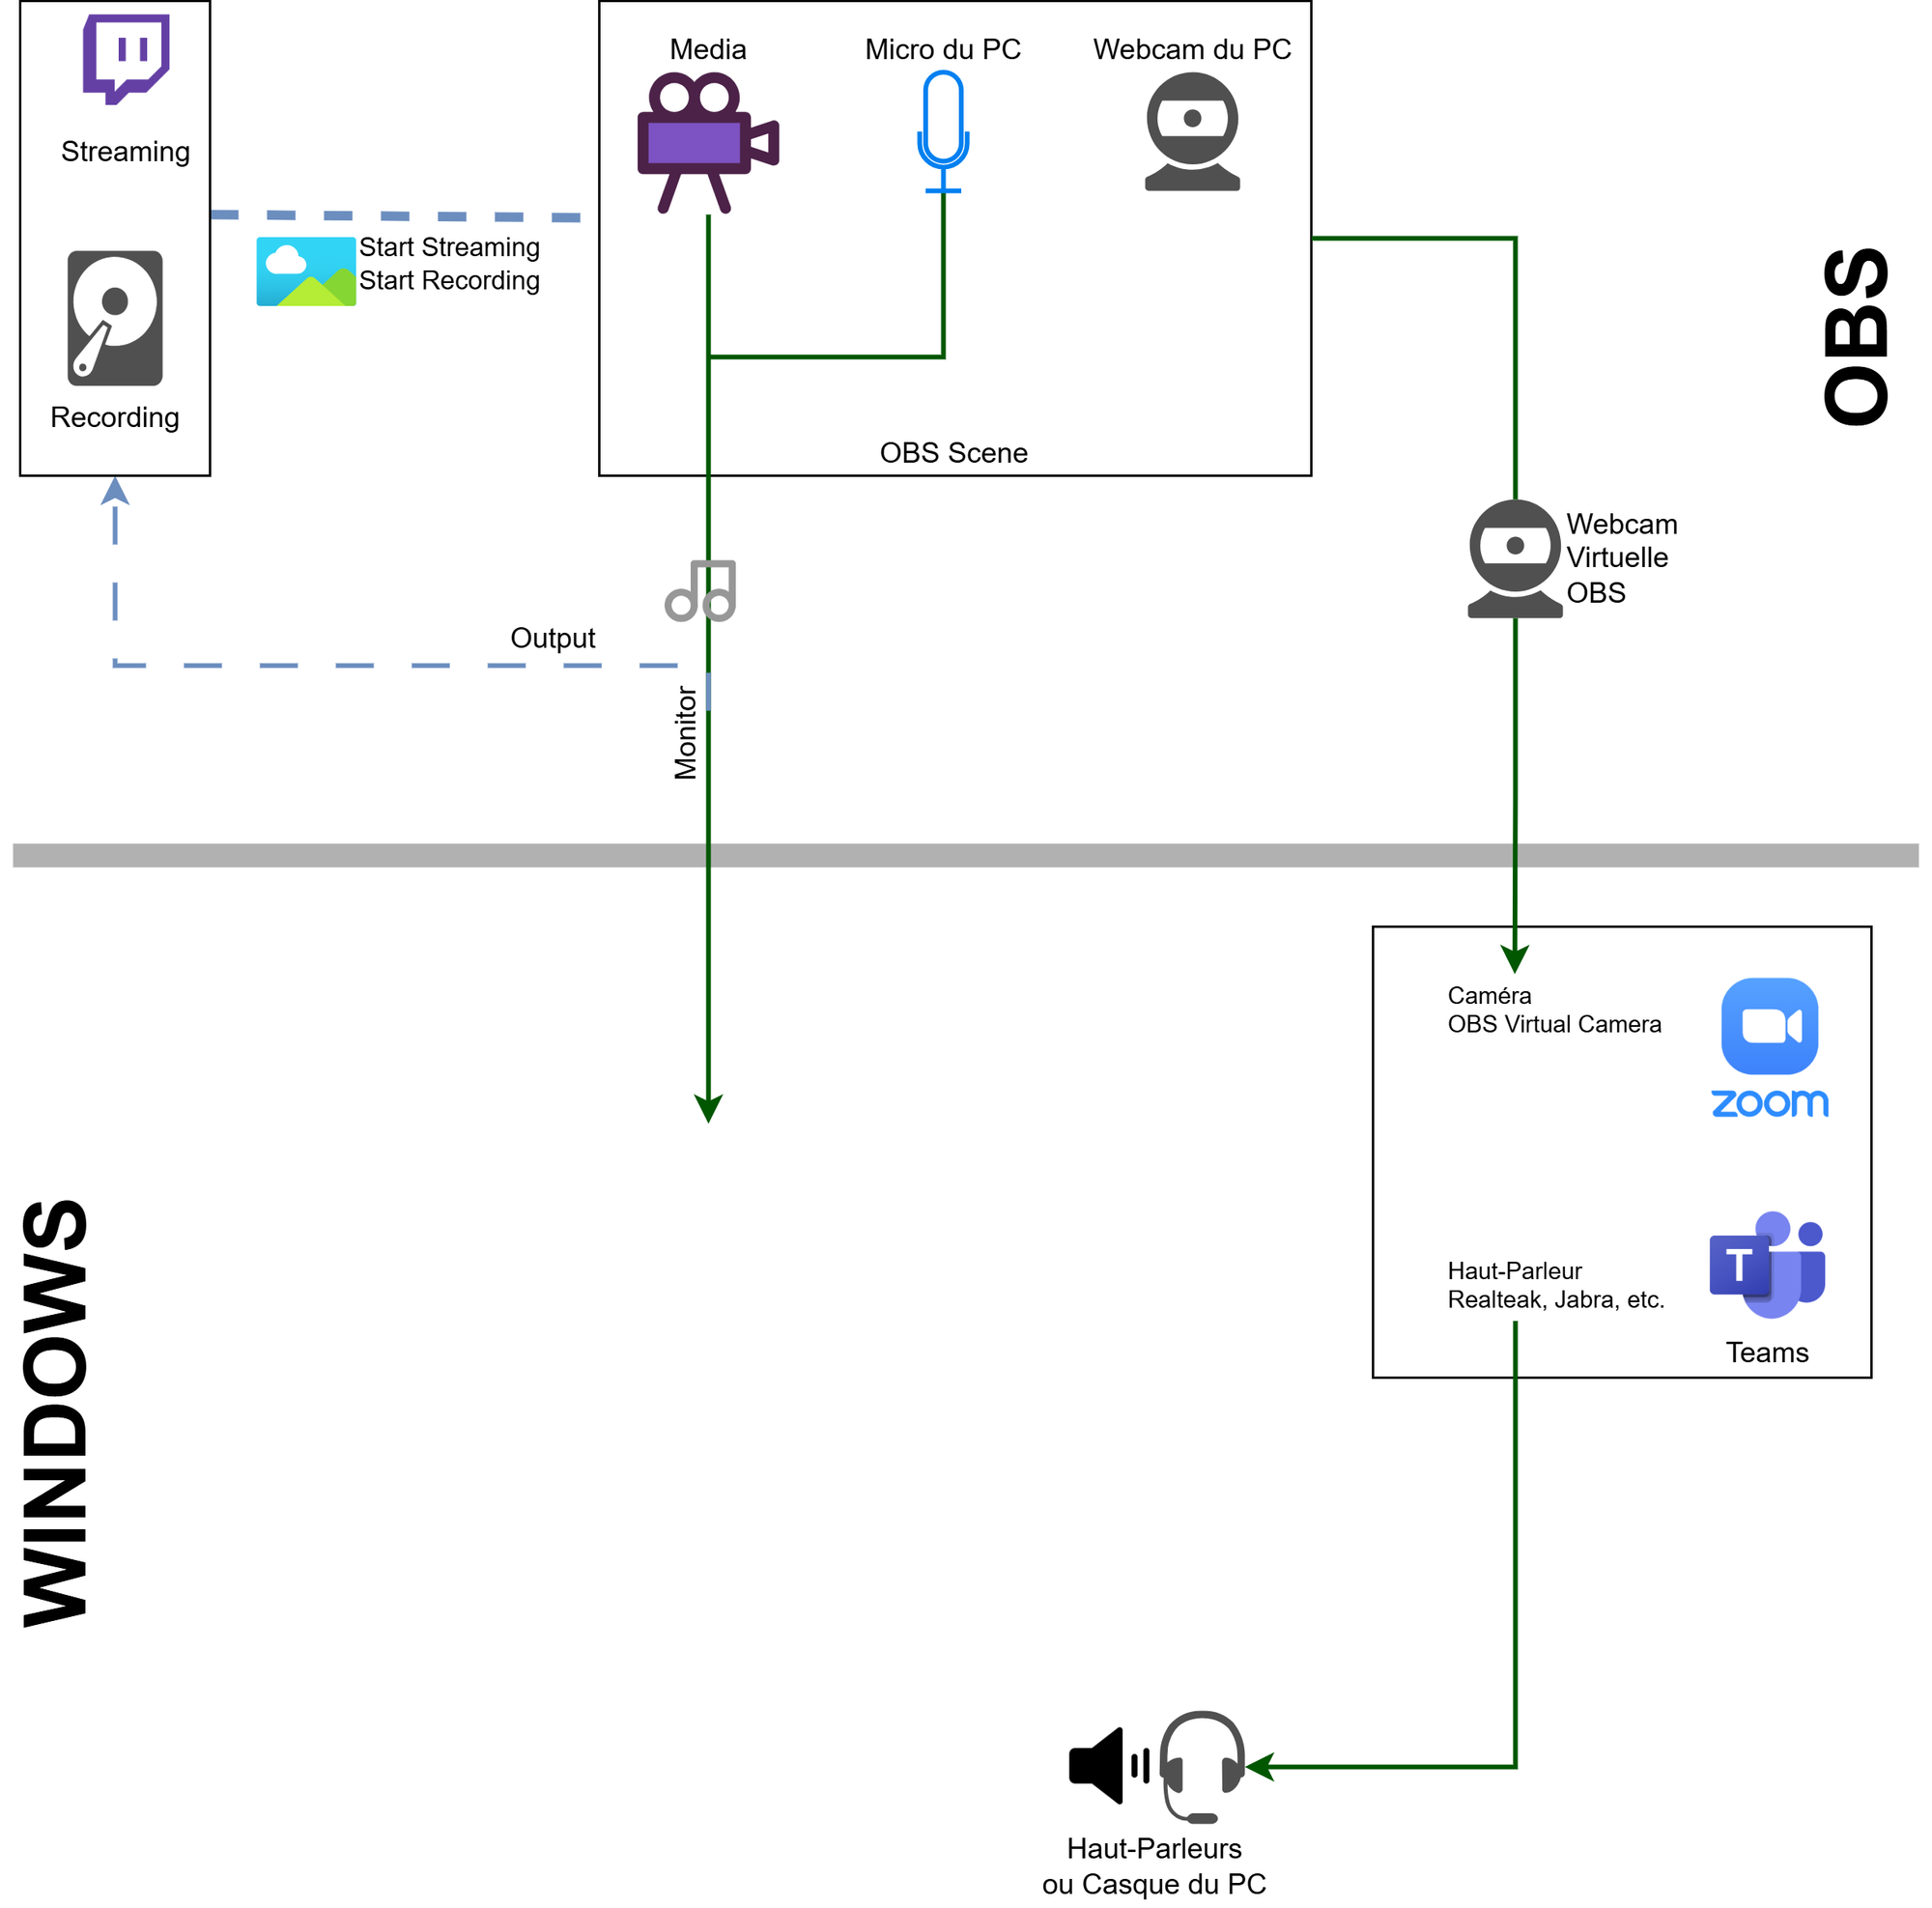
Part 1: OBS
How it works
By default, OBS is designed
- to send a scene to a streaming platform like Twitch,
- or to record a scene (with sound) to disk.
The Output sound goes to streaming or disk recording.
The Monitoring output lets a streamer hear (in their headphones, for example) what the viewers hear = we activate Monitoring and choose where the “monitored” sound goes.
We’re hijacking this function by using the Monitoring output. Normally, the sound goes to the headset, but here we’ll send it to a virtual device (VB-Audio).
In the diagram below, we add the explanation of Output and Monitor for each scene component.
The Output doesn't interest us, as it’s meant for other use cases.
We’ll use the Monitoring output, which we’ll later redirect to Teams or Zoom.
Configuration
First, you must configure in OBS where the monitored sound will go.
Menu File / Settings / Audio / Advanced / Audio Monitoring Device / CABLE Input (VB-Audio Virtual Cable)
In OBS’s main window, you now have three possibilities for routing sound.
In Advanced Audio Properties, the Audio Monitoring column decides where the media’s sound goes:
- Monitor Off (implies Output On):
- goes to streaming and recording
- not in the headset
- Monitor only (mute output):
- goes to the headset
- not to streaming and recording
- Monitor and Output
- goes to both
→ We don’t need Output: it’s for streaming and recording.
We just need to enable Monitor, sending sound to the configured device = CABLE Input (VB-Audio Virtual Cable)
Here, we inject the output of the Media and our Microphone into the Monitor:
Sometimes it suddenly stops working: you need to restart OBS and check the Audio Monitoring.
Part 2: Windows
We’re using here the VB-Audio driver we installed, which is very simple to use.
By default and by design, everything that is:
- sent to CABLE Input
- for example, the sound of a media
- is copied to CABLE Output
- an additional virtual microphone in Windows
Result: the “sound” of a media is injected into a virtual microphone, which can be used as a mic in Teams or Zoom = the sound of that media is heard by the other person.
In the following diagram, we explain the final part: the VB-Audio driver.
What goes into CABLE Input is copied into CABLE Output. CABLE Output is then used as the mic in Zoom or Teams (instead of your normal mic).
Note that a common step found in many online tutorials—to listen to CABLE Output—is optional. It lets you hear the video being sent to your audience. The downside is that it also lets you hear your own mic, creating unwanted echo (although, of course, there are technical solutions to mitigate this).
Configuration
Thus, we understand that the following step is optional: it simply lets you listen to the media on your own headset or PC speakers.
In fact, if a media’s output is CABLE Input, the media won’t be heard on your speakers.
- In System / Sound
- Right-click on Speaker / Audio Settings
- Scroll to the bottom: More sound settings
- Or directly open with Win + R / mmsys.cpl
- In the Sound window / Recording tab / double-click CABLE Output
- CABLE Output Properties window
- check "Listen to this device"
- choose "Playback through this device" / Speakers
