Coucou everyone!
In VMWare ESX (3.0 to 4.1i), you sometimes want to make a copy of an existing VM in production, for example to use the new one as a lab to developp new apps.
There are many ways to do that. The dirty one is simply to copy the VMDK+VMX files of the original VM to a new directory, then adding the VM to the ESX Inventory.
But you have to do it in the proper way for the Ethernet interface to be handled well.
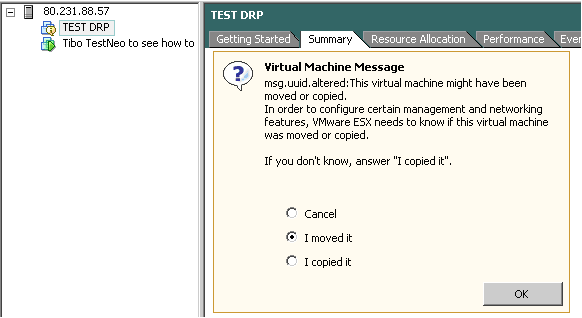
When your start that new VM, the ESX will ask you a strange question :
On ESX 3 :

On ESX 4.1i :

These messages mean that the ESX have detected you have copied the VM, so it wonders if it’s a new VM or the same VM that has been moved.
Why is it important to know the difference?
Because in the case of a copy, you don’t want the new VM to have the same identifying characteristics as the original one.
For example, the MAC addresses of the interfaces must be different from the new VM to the original one, otherwise the new VM will basically receive the ethernet frames addressed to the original VM if they are on the same physical network (or VLAN), and/or prevent the original VM to receive them.
So if we are talking about two different machines that have to run, we’ll have to answer Create or I copied it.
Consequences in Ubuntu
Then you start your new VM, containing the same OS, say a Linux Ubuntu 10.04 as the original VM.
Note : Of course, you will want to disconnect the network interfaces for the first boot, thus avoiding the new VM to use the same IP address as the original VM on the network. Then, after modifying the IP configuration of your interfaces on the new VM, you restart it.
And sometimes, when you try to see the list of the interfaces available on the system, you’ll just find that :
$ ifconfig

lo        Link encap:Local Loopback
          inet addr:127.0.0.1  Mask:255.0.0.0
          inet6 addr: ::1/128 Scope:Host
          UP LOOPBACK RUNNING  MTU:16436  Metric:1
          RX packets:29745125 errors:0 dropped:0 overruns:0 frame:0
          TX packets:29745125 errors:0 dropped:0 overruns:0 carrier:0
          collisions:0 txqueuelen:0
          RX bytes:3250586667 (3.2 GB)  TX bytes:3250586667 (3.2 GB)
The interfaces you’ve added, namely eth0 and eth1 (for example), don’t appear. But you’re so sure the network interfaces are declared and connected in the ESX! A up/down of the interfaces won’t do anything, if the problem comes from the udev persistent rules.
We know that udev manages how devices are added in the /dev directory of the system. Each time the system is started, udev analyses which devices are present on the machine and dynamically adds their device nodes in /dev.
For some devices, the addition is not so dynamic. udev won’t dynamically add the devices at startup, but will first check in the persistent rules if the devices has already been discovered. It’s particularly the case of the network interfaces. And for some weird reasons, having first interfaces in the rules prevents others to take their place.
The advantages of the persistent rules is that an interface with a certain MAC address will always have the same name in Linux, thus avoiding a certain mess in the configuration of services using this interface.
For example, this line in /etc/udev/rules.d/70-persistent-net.rules :
# PCI device 0x1022:0x2000 (pcnet32)
SUBSYSTEM=="net", ACTION=="add", DRIVERS=="?*", ATTR{address}=="00:0c:29:7d:b2:0d", ATTR{dev_id}=="0x0", ATTR{type}=="1", KERNEL=="eth*", NAME="eth0"
tells us that the interface with the MAC address 00:0c:29:7d:b2:0d will always have the name eth0 in Linux.
How to solve the problem ?
The new VM you’ve just copied and started will have a new VM UUID and especially new MAC addresses for the interfaces. Well, since the udev persistent rules are still the same as in the original VM (containing different MAC addresses, those of the original VM), the solution is simply to…
…erase /etc/udev/rules.d/70-persistent-net.rules (or remove some entries manually).
References :
http://www.wekadesign.co.nz/2010/09/16/missing-network-interfaces-in-ubuntu-under-vmware-esxi/


